How To Set Up GFK-280 Liquid Filling Machine?
The GFK-280 liquid filling machine is a versatile and efficient piece of equipment widely used in industries such as food and beverage, cosmetics, and pharmaceuticals. Setting up this machine properly is crucial to ensure accurate and efficient liquid dispensing. This guide will walk you through the step-by-step process of setting up the GFK-280, focusing on both mechanical and operational aspects. Whether you are a seasoned technician or new to the industry, these instructions will help you get the most out of your machine.
1. Unpacking and Initial Inspection
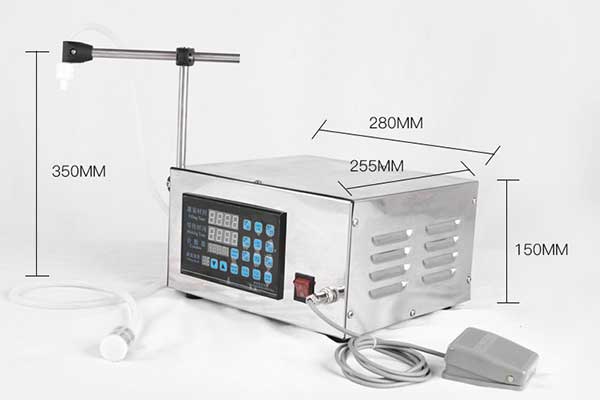
Before you begin setting up the GFK-280 liquid filling machine, it’s essential to unpack it carefully. Ensure that all components are intact and no parts are missing. The gfk-280 liquid filling machine should come with the main filling unit, power cords, tubing, nozzles, and control panel.
Inspect the liquid filling machine: Look for any signs of damage that may have occurred during shipping. If there are any issues, contact the supplier immediately for assistance.
Check the accessories: The GFK-280 liquid filling machine is usually equipped with additional nozzles and tubing to accommodate different liquid types and filling capacities.
Once you are confident that everything is in order, proceed to the next step.
2. Setting Up the Machine Base
The GFK-280 liquid filling machine should be installed on a stable and flat surface. The workspace should be free from vibration, as this could impact the machine’s accuracy during operation.
Position the machine: Make sure the liquid filling machine is at a comfortable working height for the operator. The placement should allow for easy access to both the control panel and the liquid container.
Ensure proper ventilation: Since the liquid filling machine uses electrical components, it’s vital to set it up in a well-ventilated area to avoid overheating.
Setting the liquid filling machine on a solid base will contribute to more accurate filling and longer equipment lifespan.
3. Connecting the Tubing
Next, attach the tubing that will transport the liquid from your container to the filling nozzle. The tubing should be food-grade or chemically resistant, depending on the liquid you are filling.
Attach the inlet tubing: Connect the tubing to the inlet valve of the GFK-280 liquid filling machine. Ensure the connection is secure to prevent leakage.
Attach the outlet tubing: Connect the other end of the tubing to the filling nozzle. It’s crucial that this connection is tight to maintain accurate dispensing.
Once the tubing is connected, ensure there are no kinks or bends that might restrict the liquid flow.
4. Powering the Machine
The GFK-280 liquid filling machine is powered by an electrical source. Plug the power cord into a standard electrical outlet.
Turn on the liquid filling machine: Use the power switch located on the control panel to turn on the machine. After powering it up, the display should light up, and the system will perform a self-check.
Check the voltage: Ensure the gfk-280 liquid filling machine operates within the correct voltage range specified by the manufacturer. Incorrect voltage could damage the system or lead to malfunction.
Once powered on, the liquid filling machine is ready for calibration and operation.
5. Calibrating the Machine
Calibration is one of the most critical steps in setting up the GFK-280 liquid filling machine. Proper calibration ensures that the machine dispenses the correct volume of liquid every time.
Set the filling volume: Use the control panel to input the desired filling volume. The liquid filling machine is highly precise, capable of filling between 5ml and 2800ml of liquid.
Test the fill: Perform a few test runs to ensure the machine is dispensing the correct amount of liquid. Place a container under the nozzle and run the machine. Measure the dispensed liquid to confirm accuracy.
It’s essential to recalibrate the machine if you switch between liquids of different viscosities or when changing the filling volume.
6. Adjusting Filling Speed
The GFK-280 liquid filling machine allows you to adjust the speed of the filling process. Depending on the type of liquid, you may need to increase or decrease the speed for optimal results.
Increase speed for low-viscosity liquids: For thin liquids such as water, a higher filling speed is ideal. This will help speed up production without sacrificing accuracy.
Decrease speed for high-viscosity liquids: For thicker liquids such as syrups or oils, a slower filling speed will prevent splashing or overfilling.
Make adjustments as needed to suit the liquid being filled and the container size.
7. Setting the Filling Mode
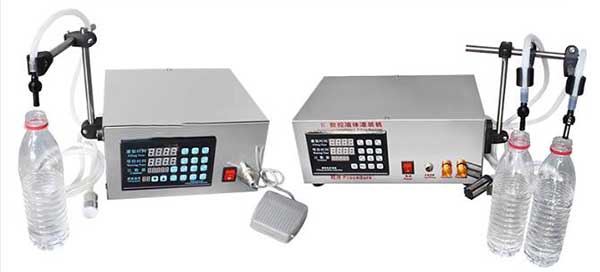
The GFK-280 liquid filling machine features two primary filling modes: manual and automatic.
Manual mode: In manual mode, the operator presses a button or foot pedal to initiate the filling process. This is ideal for small batches or when high precision is needed.
Automatic mode: For larger production runs, automatic mode is more efficient. The liquid filling machine fills the containers automatically once set, reducing the need for constant operator intervention.
Select the mode that best suits our production needs.
8. Nozzle Adjustment and Placement
Proper nozzle placement is essential to ensure clean and accurate filling. Depending on the container’s size and shape, you may need to adjust the nozzle height.
Adjust nozzle height: The nozzle should be placed just above the container opening to minimize splashing. For deeper containers, you may want to lower the nozzle into the container for a smoother fill.
Check nozzle alignment: The nozzle should be centered over the container to avoid spillage. Misalignment could lead to liquid being dispensed outside of the container.
Carefully adjusting the nozzle will help ensure a clean and efficient filling process.
9. Running a Test Batch
Before moving into full-scale production, it’s crucial to run a test batch. This allows you to check if all settings are correct and ensures that the liquid filling machine is functioning as expected.
Monitor the filling process: Observe the first few fills to ensure there are no leaks or inaccuracies. If adjustments are needed, make them immediately.
Check consistency: Ensure that the liquid volume in each container is consistent. If there are any discrepancies, recalibrate the machine before proceeding with larger batches.
Running a test batch helps prevent errors and ensures high-quality output.
10. Maintenance and Cleaning
Regular maintenance is vital to keep the GFK-280 liquid filling machine running smoothly.
Clean the liquid filling machine: After each use, clean the tubing and nozzles to prevent clogging. Residue from the liquid can harden and interfere with future filling operations.
Lubricate moving parts: Periodically check the moving parts of the machine for wear and tear. Apply food-grade lubricant where necessary to keep the liquid filling machine running efficiently.
Check electrical components: Inspect the power cord and control panel for any signs of damage. Address issues promptly to avoid downtime.
A well-maintained machine will last longer and ensure continued operational efficiency.
Conclusion
Setting up the GFK-280 liquid filling machine requires attention to detail, from unboxing and inspection to calibration and maintenance. Following these steps ensures accurate and efficient liquid filling, helping to improve your production processes. Whether you’re filling small batches or scaling up for mass production, the GFK-280 liquid filling machine is a reliable and flexible solution when set up correctly. Regular maintenance and proper handling will further extend the gfk-280 liquid filling machine’s lifespan, keeping your operations running smoothly.